Getting Started with Git and GitHub
You will learn the fundamentals of Git and GitHub from this article, which will assist you in setting up your local repository, managing files, utilising branches, and pushing changes to GitHub.
What is Git?
Git is a powerful version control system that makes tracking changes to the code over time more accessible. It allows to:
- Store multiple versions: Save different versions of your project, making it easy to revert to older states if needed.
- Collaborate with others: Work on projects with various people by merging changes and resolving conflicts.
- Experiment freely: To test out new features or problem fixes without affecting the main codebase, create branches.
What is GitHub?
GitHub is a popular platform for hosting Git repositories. It helps store code online, collaborate with others, and track project changes.
What is GitLab?
A web-based tool called GitLab assists developers in tracking and managing their coding projects. Teams can collaborate on code, manage changes, and automate testing and deployment with its version control, collaboration, and continuous integration features.
Similarities between GitHub and GitLab
- Store Code: Allows the storage of Git repositories online.
- Track changes: View the history of your project and see who changed what.
- Collaborate with others: Share your code and work with others on projects.
Difference between GitHub and GitLab
GitHub and GitLab are both platforms for hosting and managing code, but they have some key differences:
| GitHub | GitLab |
| Collaboration and version control | Complete DevOps platform with CI/CD |
| Widely used, especially for open-source | Growing in popularity, especially for private projects |
| Requires third-party tools or GitHub Actions | Built-in and fully integrated |
| Cloud-hosted, limited self-hosting (GitHub Enterprise) | Cloud-hosted and full self-hosting are available |
| Basic security features | Advanced security features and compliance tools |
Note: It depends on which one (GitHub or GitLab) you want to use. Here, we’ll walk you through a quick setup process to get Git set up locally and publish the code in a GitHub repository. You can initialise a Git repository and connect it to GitHub by following the procedures outlined in this article.
Setting Up Git
We can set up Git by following some easy steps. Please follow every step carefully to use Git with Github.

Installation & Configuration
1. Download and install Git: Visit the official Git website and download the installer for your operating system.
2. Configure Git: Configure Git with your username and email address, open the terminal (or command prompt) and run the following commands,
git config --global user.name "Username"git config --global user.email "[email protected]"Note: Please replace “username” with your username and “[email protected]” with your GitHub/GitLab email address.
Creating a New Git Repository
- Navigate to your project directory: Open the terminal and use the cd command to navigate to the directory where you want to create your repository.
- Initialize Git: Run the following command to initialise a Git repository:
git initThis command will create a hidden .git directory in the project folder, which contains all the Git information.
Adding Files to the Repository
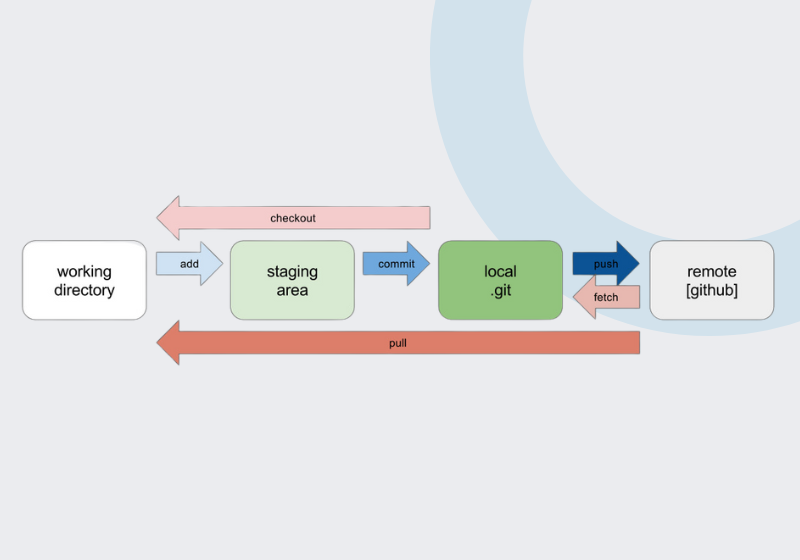
- Stage files: Use the git add to stage the files to track them in the repository. You can also add specific or all files using the following commands.
Add a specific file
git add filename.txt Add all files in the current directory.
git add .- Commit changes: Once you’ve staged the files, commit them with a descriptive message explaining the changes.
git commit -m "Initial commit"Working with Branches
- Create a new branch: Use the “git branch” command to create a new branch:
git branch feature-branch- Switch to a branch: Use the `git checkout` command to switch to a different branch:
git checkout feature-branch- Make changes and commit: Make changes to files in a branch, stage them with “git add”, and commit them with “git commit”.
- Merge branches: You can merge a branch back into the main branch after you’ve completed working on it:
 git checkout main
 git merge feature-branch
Pushing to GitHub
- Create a new GitHub repository: Go to the GitHub account and create a new repository.
- Link your local repository to GitHub: In your terminal, use the “git remote add origin” command to link your local computer and link it to a GitHub repository. Replace `username` and `repo-name` with your GitHub username and repository name:
git remote add origin https://github.com/your-username/repo-name.git- Push your changes to GitHub: Use the `git push` command to upload your local changes to the remote repository:
git push origin mainIn just a few steps, you’ve successfully set up Git on your local computer and linked it to a GitHub repository. You may now handle and share your code with others. We plan to provide more in-depth insights on this topic. You can practice and investigate further if you’d like to learn more.


